Hello everyone, and happy new year. A bit late but oh well.
It’s been a while, but a lot has happened which kept me from posting.
Anyway, today I want to check out the Extreme Networks EXOS/Switch Engine switches.
To get started with a minimal setup (since I don’t have any physical switches available), I’ll be using GNS3 for simulation purposes. For those who may need a refresher, I previously created a guide to setting up GNS3, which can be found here.
You can get the link to the image from GNS3 marketplace without creating a Extreme Networks account, which is pretty nice.
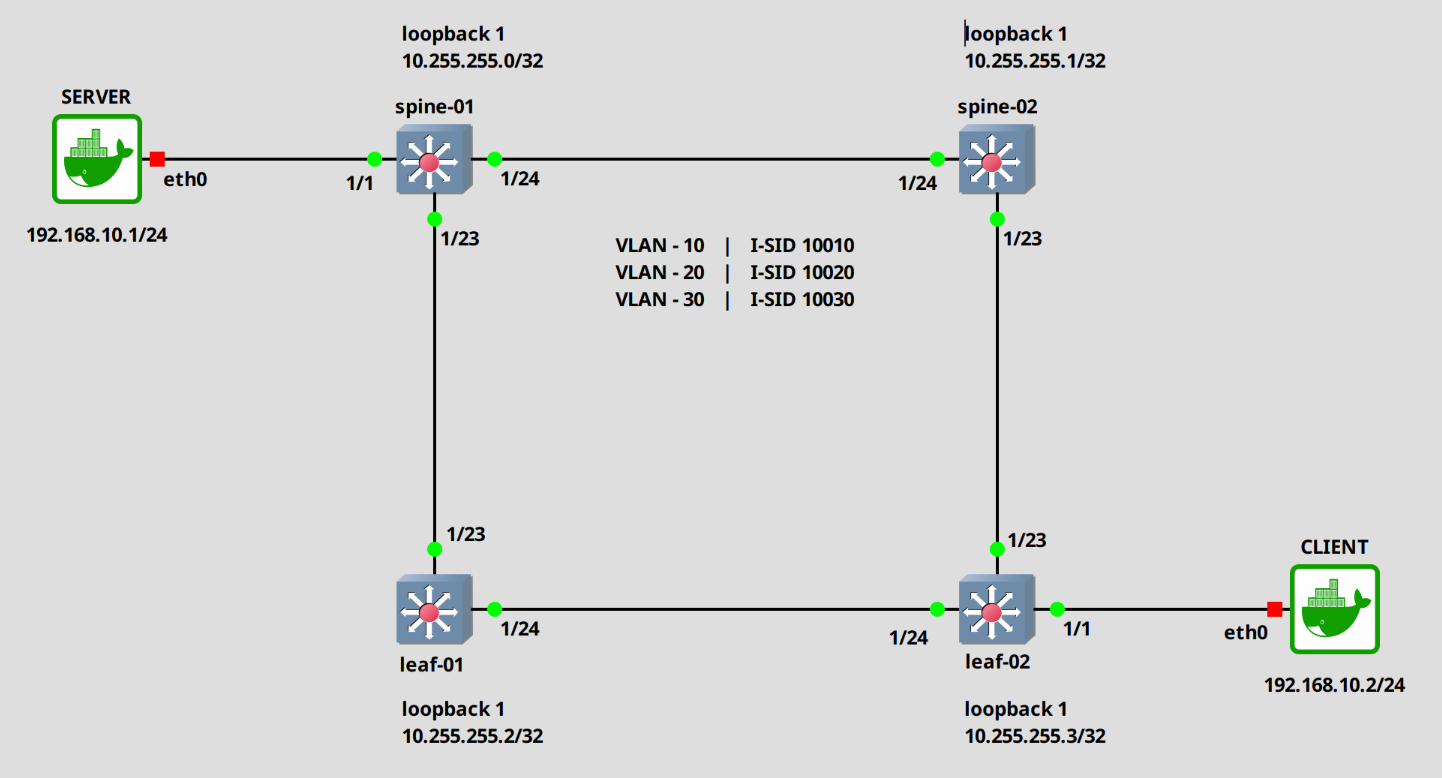
In this post, we’ll begin with the basics of creating VLANs and assigning IP addresses. To facilitate this, I’ll create a simple topology consisting of two virtual switches and two Linux systems, allowing us to test connectivity and test the capabilities of these switches.
| EXOS-01 | VLAN 10 (LAB) VLAN 20 (OFFICE) | 10.10.10.1/24 10.20.20.1/24 |
|---|---|---|
| EXOS-02 | VLAN 10 (LAB) VLAN 20 (OFFICE) | 10.10.10.2/24 10.20.20.2/24 |
| client-01 | VLAN 10 (LAB) | 10.10.10.10/24 |
| client-02 | VLAN 10 (LAB) | 10.10.10.20/24 |
First Steps
Setting up the switch
Let’s get started with setting up our virtual switches using GNS3. We’ll begin by booting them up and logging in as the default admin user, which has no password initially.
As we configure our switches, we’ll be prompted to answer some security-related questions. For this, I’ll accept the default settings to keep things simple.
Multiple Spanning Tree Protocol (MSTP) is enabled by default to preventbroadcast stormsWould you like to disable MSTP? [y/N/q]:The switch offers an enhanced security mode. Would you like to read more,and have the choice to enable this enhanced security mode? [y/N/q]:Telnet is enabled by default. Telnet is unencrypted and has been the target ofsecurity exploits in the past.Would you like to disable Telnet? [y/N/q]:SNMP access is disabled by default. SNMPv1/v2c uses no encryption, SNMPv3 can beconfigured to eliminate this problem.Would you like to enable SNMPv1/v2c? [y/N/q]:Would you like to enable SNMPv3? [y/N/q]:All ports are enabled by default. In some secure applications, it may be moredesirable for the ports to be turned off.Would you like unconfigured ports to be turned off by default? [y/N/q]:No failsafe account username and password are in effect. If you choose toconfigure them, please remember them because they cannot be recovered.Would you like to configure the failsafe username and password now? [y/N/q]:Since you have chosen less secure management methods, please remember toincrease the security of your network by taking the following actions:* change your admin password* EXOS-VM.1 #
Next, let’s secure our switches by setting a password for the admin user. To do this, we’ll use the following command to set a new password.
For clarity, I’ll only show the configuration commands and output of both switches, if there are any differences between the two.
EXOS-VM # configure account admin passwordCurrent user's password:New password:Reenter password:
Let’s set the hostname for our switches. To do this, we’ll use the “configure snmp” command. Replace the colored text with your desired hostname.
# Switch 01EXOS-VM # configure snmp sysName EXOS-01
# Switch 02EXOS-VM # configure snmp sysName EXOS-02
Show commands
Alright. Now let’s go through a few “show” commands to get a better idea of the current setup.
EXOS-01 # show portsPort SummaryPort Display VLAN Name Port Link Speed Duplex# String (or # VLANs) State State Actual Actual===========================================================================1 Default E A 100 FULL2 Default E R3 Default E R4 Default E R5 Default E R6 Default E R7 Default E R8 Default E R9 Default E R10 Default E R11 Default E R12 Default E A 100 FULL========================================================================Port State: D-Disabled, E-Enabled, F-Disabled by link-flap detection,L-Disabled due to licensingLink State: A-Active, R-Ready, NP-Port not present, L-Loopback,D-ELSM enabled but not up,d-Ethernet OAM enabled but not up,B-MACsec enabled but blocked awaiting authentication
If you’d like to prevent the output from refreshing every second, you can use the following command.
EXOS-01 # show ports no-refresh
Next, let’s display the VLANs.
EXOS-01 # show vlanUntagged ports auto-move: Inform-----------------------------------------------------------------------------------------------Name VID Protocol Addr Flags Proto Ports VirtualActive router/Total-----------------------------------------------------------------------------------------------Default 1 --------------------------------T-------------- ANY 2 /12 VR-DefaultMgmt 4095 ----------------------------------------------- ANY 0 /1 VR-Mgmt-----------------------------------------------------------------------------------------------
We currently have two defaults VLANs configured. VLAN 1 and VLAN 4095. The latter is used for the OOBM (Out-of-Band Management) and assigned to a different VRF (Virtual Routing and Forwarding), indicated on the right side of the output.
We can display the ports and their assigned VLANs with the following command.
EXOS-01 # show ports vlanshow ports vlanUntaggedPort /Tagged VLAN Name(s)-------- -------- ------------------------------------------------------------1 Untagged Default2 Untagged Default3 Untagged Default4 Untagged Default5 Untagged Default6 Untagged Default7 Untagged Default8 Untagged Default9 Untagged Default10 Untagged Default11 Untagged Default12 Untagged Default
Creating VLANs
Let’s create a few VLANs and assign VLAN 10 to port 1. For this we will be using the “create” and “configure” commands.
# Create VLAN 10 with the name "LAB" and assign it the port 1 untagged and tagged to port 12.EXOS-01 # create vlan LAB tag 10EXOS-01 # configure vlan LAB add port 1 untagged ## Linux client assigned to this portEXOS-01 # configure vlan LAB add port 12 tagged ## Link to the second switch# Create VLAN 20 with the name "OFFICE" and tag port 12.EXOS-01 # create vlan OFFICE tag 20EXOS-01 # configure vlan OFFICE add port 12 tagged# Check the configurationEXOS-01 # show vlan Untagged ports auto-move: Inform-----------------------------------------------------------------------------------------------Name VID Protocol Addr Flags Proto Ports VirtualActive router/Total-----------------------------------------------------------------------------------------------Default 1 --------------------------------T-------------- ANY 1 /11 VR-DefaultLAB 10 ----------------------------------------------- ANY 2 /2 VR-DefaultMgmt 4095 ----------------------------------------------- ANY 0 /1 VR-MgmtOFFICE 20 ----------------------------------------------- ANY 0 /0 VR-DefaultEXOS-01 # show ports vlan UntaggedPort /Tagged VLAN Name(s)-------- -------- ------------------------------------------------------------1 Untagged LAB2 Untagged Default3 Untagged Default4 Untagged Default5 Untagged Default6 Untagged Default7 Untagged Default8 Untagged Default9 Untagged Default10 Untagged Default11 Untagged Default12 Untagged DefaultTagged LAB
Assigning IP addresses to the vlan interfaces
Alright. Let’s assign an IP to the VLANs.
# Set the IP addressEXOS-01 # configure vlan LAB ipaddress 10.10.10.1/24EXOS-01 # configure vlan OFFICE ipaddress 10.20.20.1/24
# Set the IP addressEXOS-02 # configure vlan LAB ipaddress 10.10.10.2/24EXOS-02 # configure vlan OFFICE ipaddress 10.20.20.2/24
Testing connectivity
Next, we will be using the Linux systems connected to each switch to ping and check for connectivity between them. For this, we need to assign an IP address to each client in the same network.
# setup IP address on clientsclient-01 # ifconfig eth0 10.10.10.10/24client-02 # ifconfig eth0 10.10.10.20/24# Ping client-02 from client-01client-01 # ping 10.10.10.20PING 10.10.10.20 (10.10.10.20) 56(84) bytes of data.64 bytes from 10.10.10.20: icmp_seq=1 ttl=64 time=4.38 ms64 bytes from 10.10.10.20: icmp_seq=2 ttl=64 time=1.98 ms
Command list
Here are the commands in a comprehensive list for quick access.
### Configuration# set passwordEXOS-VM # configure account admin password# set hostnameEXOS-VM # configure snmp sysName <hostname># create VLANEXOS-VM # create vlan <vlan-name> tag <vlan-tag>EXOS-VM # create vlan OFFICE tag 200# set IP address for VLANEXOS-VM # configure vlan <vlan-name or vlan-id> ipaddress <ip-address/prefix>EXOS-VM # configure vlan OFFICE ipaddress 10.200.200.1/24# assign port to VLANEXOS-VM # configure vlan <vlan-name or vlan-id> add port <port-number> <tagged / untagged>EXOS-VM # configure vlan OFFICE add port 5 tagged# save configurationEXOS-VM # save
### Show Commands# show running configuration# show vlan and assigned ip addressEXOS-VM # show vlan# show vlan assigned to portsEXOS-VM # show ports vlan# show portsEXOS-VM # show ports# show ports no refreshEXOS-VM # show ports no-refresh# show ports with VLAN tagEXOS-VM # show ports tag 200# show configurationEXOS-VM # show configuration# show configuration for specific moduleEXOS-VM # show configuration vlan
Ok. That’s it for today. I will go into more details the next time I guess, but this should be enough for now.
Alright. Till next time.
Comments