Radius Server Deployment, Integration with FreeIPA, TLS Configuration, CRL Configuration
Hello there,
today we will deploy a radius server and try to integrate it with FreeIPA. Please keep in mind, that I am not very familiar with the FreeRadius server configuration. So this is probably not the most secure way of configuring the server. I don’t know. We will implement LDAPS and TLS with FreeIPA certificates for the authentication.
For this, I deployed another Rocky Linux server, naming it “TEST-FREERADIUS”, installed the usual packages and updates and joined it to the FreeIPA domain.
System Information
| Hostname | IP | Function |
|---|---|---|
| TEST-IPA01 | 192.168.152.220/24 | Identity, Policy Management, DNS, DHCP, Certificate Authority |
| TEST-FEDORA | 192.168.152.225/24 | Linux Client |
| TEST-SHARE | 192.168.152.221/24 | NFS / SMB Server |
| TEST-FREERADIUS | 192.168.152.222/24 | Radius Server |
Network Information
| Network | 192.168.152.0 |
|---|---|
| Subnet | 255.255.255.0 |
| Gateway | 192.168.152.254 |
FreeRADIUS Installation and Configuration
FreeRADIUS Installation
Let’s begin.
First we need the “freeradius” packages.
test-freeradius :: ~ » sudo dnf install freeradius freeradius-utils freeradius-ldap freeradius-krb5
Now navigate to “/etc/raddb/certs” and execute the bootstrap script. This will generate certificates with the provided script. We will replace them later, but for now, we need them to start and test the server.
test-freeradius :: ~ » cd /etc/raddb/certstest-freeradius :: ~ » ./bootstrap
Next, edit the “client.conf” file under “/etc/raddb”. We will first create a backup of the original file.
# Backup the original filetest-freeradius :: ~ » mv /etc/raddb/client.conf{,-backup}# Create and edit a new client.conf filetest-freeradius :: ~ » vim /etc/raddb/client.confclient localnet { ipaddr = 192.168.152.0/24 secret = supersecretpassphrase nas_type = other limit { max_connections = 16 lifetime = 0 idle_timeout = 30 }}
Edit the files “default” and “inner-tunnel” in the “sites-enabled” folder.
First the “default” file. Find the line “-ldap” and replace it with the following.
test-freeradius :: ~ » vim /etc/raddb/sites-enabled/defaultldapif ((ok || updated) && User-Password) { update { control:Auth-Type := ldap }}
And uncomment the following.
Auth-Type LDAP { ldap }
Do the same for the “inner-tunnel” file.
test-freeradius :: ~ » vim /etc/raddb/sites-enabled/inner-tunnelldapif ((ok || updated) && User-Password) { update { control:Auth-Type := ldap }}
Auth-Type LDAP { ldap }
Alright. Now we create a symbolic link to the “/etc/raddb/mods-available/ldap” file in the “/etc/raddb/mods-enabled/” folder.
test-freeradius :: ~ » ln -s /etc/raddb/mods-available/ldap /etc/raddb/mods-enabled/
Once that’s done, edit the file.
We replace the “server = “ldap.rrdns.example.org” with our FreeIPA server and the line “base_dn = dc=test,dc=org” with the correct path.
test-freeradius :: ~ » vim /etc/raddb/mods-enabled/ldapserver = 'test-ipa01.test.intra'base_dn = 'cn=accounts,dc=test,dc=intra'
Now, we are done with the base configuration. Add the necessary firewall rules and execute the server in debug mode.
test-freeradius :: ~ » firewall-cmd --add-port={1812,1813}/udp --permanenttest-freeradius :: ~ » firewall-cmd --reload
test-freeradius :: ~ » radiusd -X...Listening on auth address * port 1812 bound to server defaultListening on acct address * port 1813 bound to server defaultListening on auth address :: port 1812 bound to server defaultListening on acct address :: port 1813 bound to server defaultListening on auth address 127.0.0.1 port 18120 bound to server inner-tunnelListening on proxy address * port 56353Listening on proxy address :: port 43374Ready to process requests
Open a new shell and test the connection with “radtest”.
test-freeradius :: ~ » radtest m.mustermann '<user-password>' test-freeradius.test.intra 1812 supersecretpassphraseSent Access-Request Id 21 from 0.0.0.0:42547 to 192.168.152.222:1812 length 82 User-Name = "m.mustermann" User-Password = "<user-password>" NAS-IP-Address = 192.168.152.222 NAS-Port = 1812 Message-Authenticator = 0x00 Cleartext-Password = "<user-password>"Received Access-Accept Id 21 from 192.168.152.222:1812 to 192.168.152.222:42547 length 20
Great, it works. Again keep in mind, that this is cleartext communication.
let’s switch to ldaps.
Edit the ldap file again and replace the “server = ldap://test-ipa01.test.intra” line with “server = ldaps://test-ipa01.test.intra”.
test-freeradius :: ~ » vim /etc/raddb/mods-enabled/ldapserver = 'ldaps://test-ipa01.test.intra'
Next, edit “default_eap_type” line in the “/etc/raddb/mods-enabled/eap” file.
fedora :: ~ » vim /etc/raddb/mods-enabled/eapdefault_eap_type = ttls
Now enable and start the radius service.
# Enable and start the radius servicetest-freeradius :: ~ » systemctl enable radiusd.service --now# Check the statustest-freeradius :: ~ » systemctl status radiusd.service● radiusd.service - FreeRADIUS high performance RADIUS server. Loaded: loaded (/usr/lib/systemd/system/radiusd.service; enabled; preset: disabled) Active: active (running) since Thu 2024-06-06 15:02:35 CEST; 2s ago Process: 1340 ExecStartPre=/bin/chown -R radiusd.radiusd /var/run/radiusd (code=exited, status=0/SUCCESS) Process: 1341 ExecStartPre=/usr/sbin/radiusd -C (code=exited, status=0/SUCCESS) Process: 1343 ExecStart=/usr/sbin/radiusd -d /etc/raddb (code=exited, status=0/SUCCESS) Main PID: 1345 (radiusd) Tasks: 6 (limit: 23156) Memory: 81.8M CPU: 947ms CGroup: /system.slice/radiusd.service └─1345 /usr/sbin/radiusd -d /etc/raddbJun 06 15:02:34 test-freeradius.test.intra systemd[1]: Starting FreeRADIUS high performance RADIUS server....Jun 06 15:02:35 test-freeradius.test.intra systemd[1]: Started FreeRADIUS high performance RADIUS server..
At this point, WIFI using TTLS with the inner authentication PAP should work, but I would like a certificate based authentication.
TLS - Configuration
Let’s go back to the certificates we generated earlier. We will replace them with the FreeIPA certificates, so we can enable TLS for the RADIUS Authentication.
Certificate setup
First, let’s delete the certificates we don’t need.
test-freeradius :: ~ » cd /etc/raddb/certstest-freeradius :: certs » rm -f *csr *key *p12 *pem *crl *crt *der *mk *txt *attr *old serial
Next, we need the CA.crt. This will be located at “/etc/ipa/”.
test-freeradius :: certs » cp /etc/ipa/ca.crt /etc/raddb/certs
Convert it to a pem file.
test-freeradius :: certs » openssl x509 -in ca.crt -out ca.pem -outform PEM
Now, we need the test-freeradius server certificate. The database for this is under “/etc/pki.”
Let’s check the database first.
test-freeradius :: ~ » cd /etc/pki/nssdbtest-freeradius :: nssdb » certutil -L -d .Certificate Nickname Trust Attributes SSL,S/MIME,JAR/XPItest-freeradius.test.intra u,u,u
Here we can see a list of the certificates, in this case, only one.
Export it as a p12 file and verify it. We need the p12 format for the private key, we will export later.
# Export the certificatetest-freeradius :: nssdb » certutil -L -d . -a -n $(hostname) > $(hostname).crttest-freeradius :: nssdb » pk12util -o $(hostname).p12 -n $(hostname) -d .Enter password for PKCS12 file: Re-enter password: pk12util: PKCS12 EXPORT SUCCESSFUL# Export the private keytest-freeradius :: nssdb » openssl pkcs12 -in $(hostname).p12 -out $(hostname).key -nodes# Check the certificatetest-freeradius :: nssdb » openssl x509 -text -noout -in $(hostname).crt
Now, copy the certificate and key to the freeradius server, make sure to name them “server.crt / server.key” and convert the certificate to a pem file.
# Copy certificatetest-freeradius :: nssdb » cp $(hostname).crt /etc/raddb/certs/server.crttest-freeradius :: nssdb » cp $(hostname).key /etc/raddb/certs/server.key# Converttest-freeradius :: nssdb » cd /etc/raddb/certstest-freeradius :: certs » openssl x509 -in server.crt -out server.pem -outform PEM
Adjust the permissions.
# User and Grouptest-freeradius :: certs » chown root:radiusd server* ca*# File permissiontest-freeradius :: certs » chmod 440 server* ca*
FreeRadius Configuration for TLS
Edit the “/etc/raddb/mods-enabled/eap” file and replace the content with the following.
test-freeradius :: ~ » vim /etc/raddb/mods-enabled/eapeap { default_eap_type = tls timer_expire = 60 ignore_unknown_eap_types = no cisco_accounting_username_bug = no max_sessions = ${max_requests} tls-config tls-common { private_key_password = private_key_file = ${certdir}/server.key certificate_file = ${certdir}/server.pem ca_file = ${cadir}/ca.pem ca_path = ${cadir} cipher_list = "PROFILE=SYSTEM" cipher_server_preference = no tls_min_version = "1.2" tls_max_version = "1.2" ecdh_curve = "prime256v1" cache { enable = no store { Tunnel-Private-Group-Id } } verify { } } tls { tls = tls-common }}
Now we can restart the FreeRADIUS service (or test it again with “radiusd -X”).
test-freeradius :: ~ » systemctl restart radiusd.service
Access Point setup
Next, we need to configure our AP. I will be using a Aruba 505 as an example. The steps are basically the same as the ones in my “Windows Server Environment from Scratch” guide.
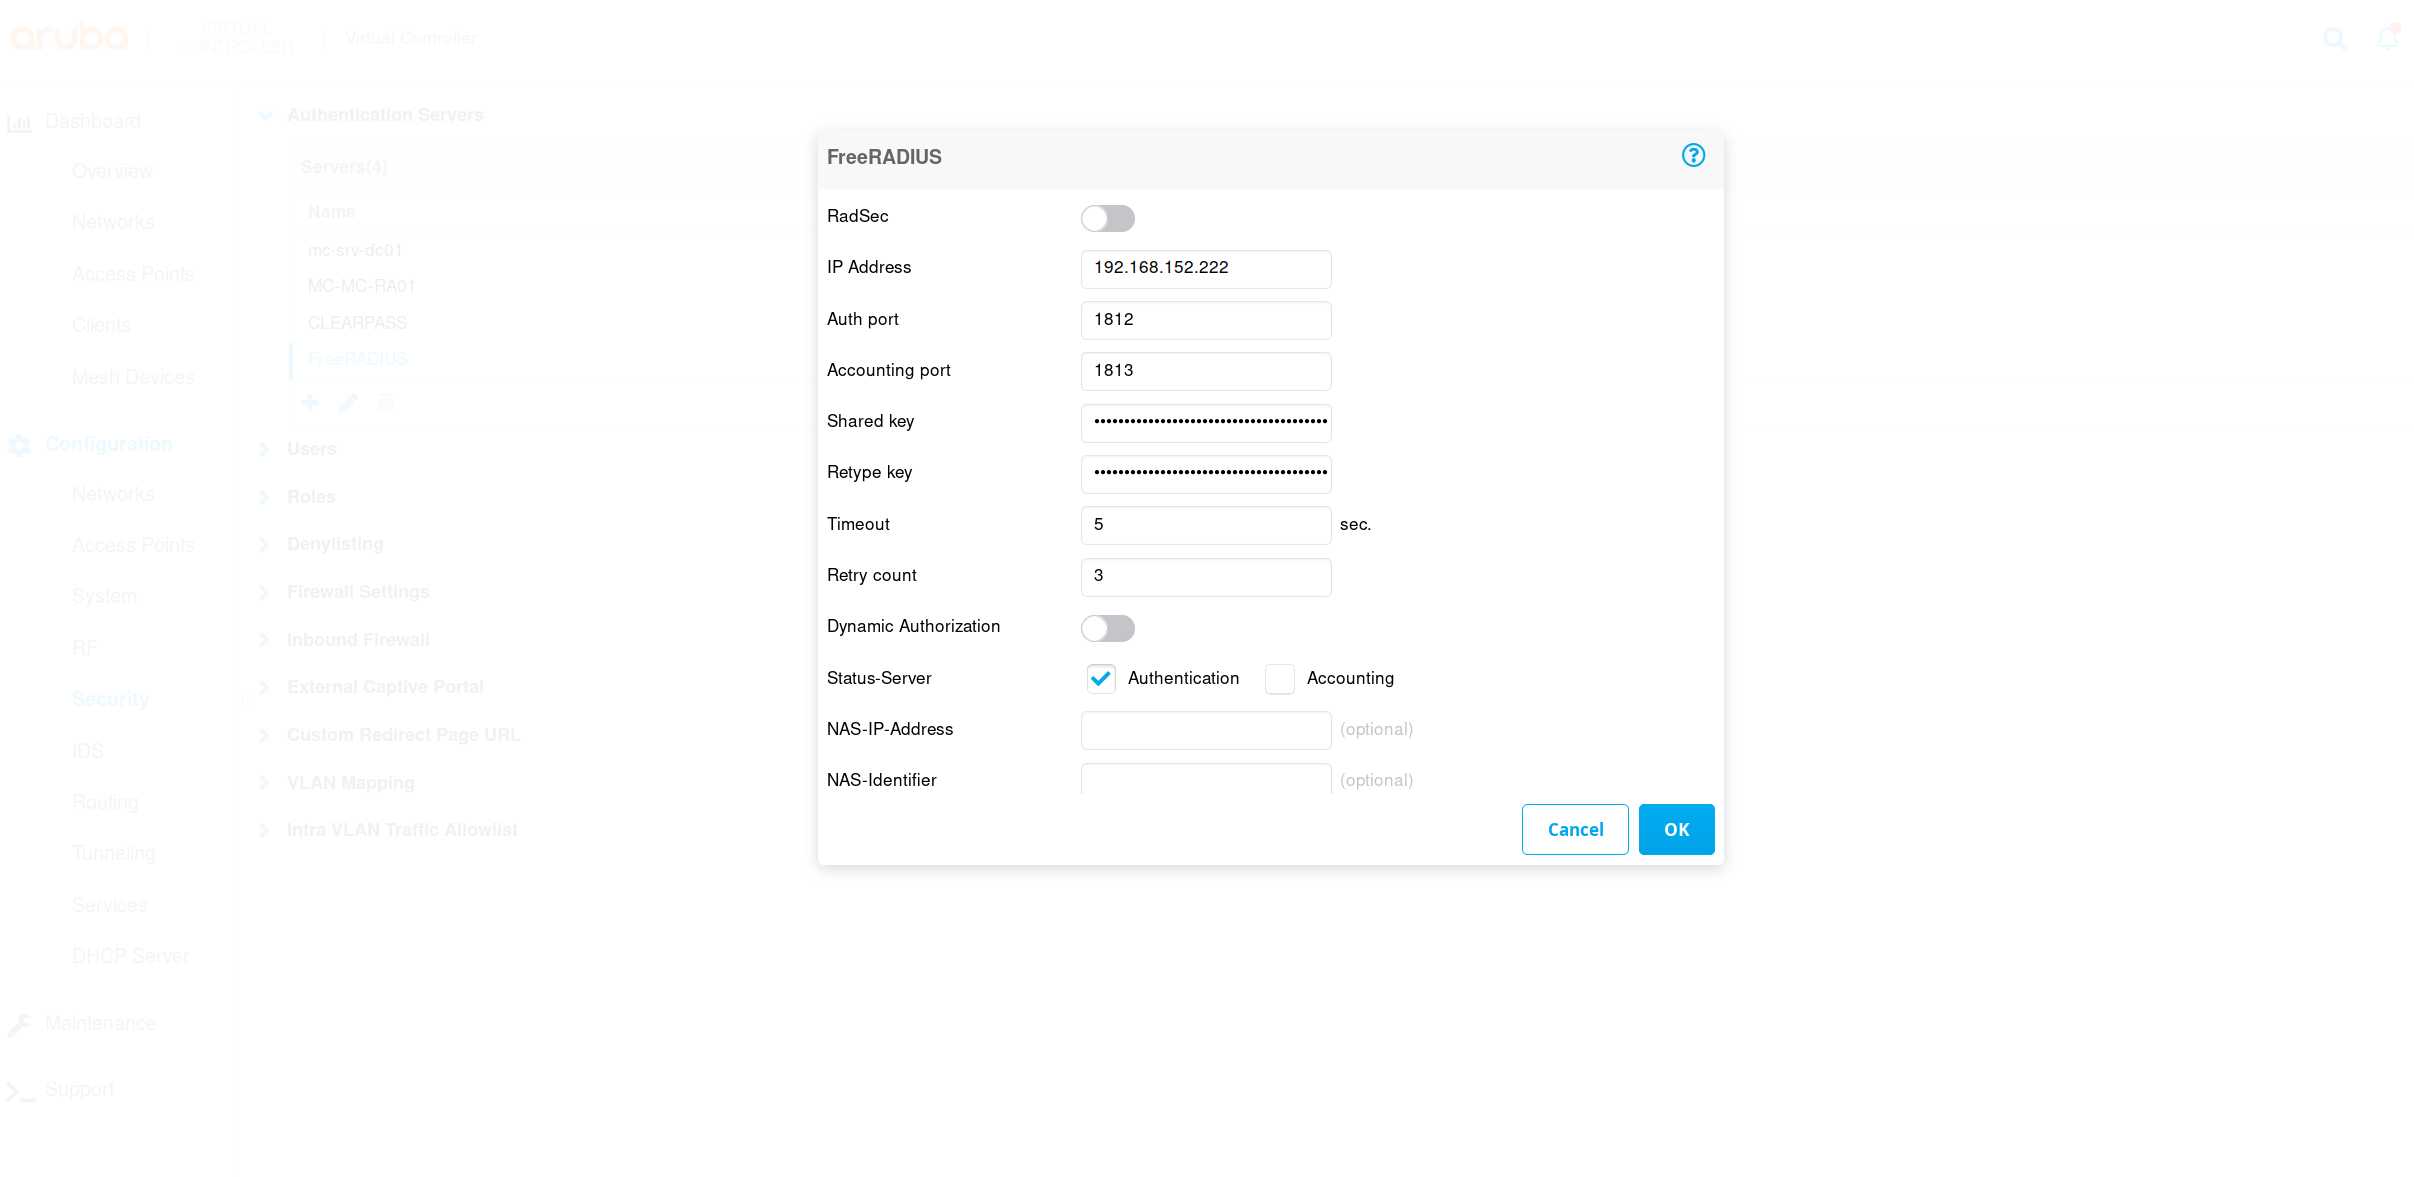
Login and navigate to “Configuration” -> “Security” and click on the + in the “Authentication Servers” section.
Make sure you select “Authentication” and type in the correct shared key (it’s the “secret” from the “client.conf” file).
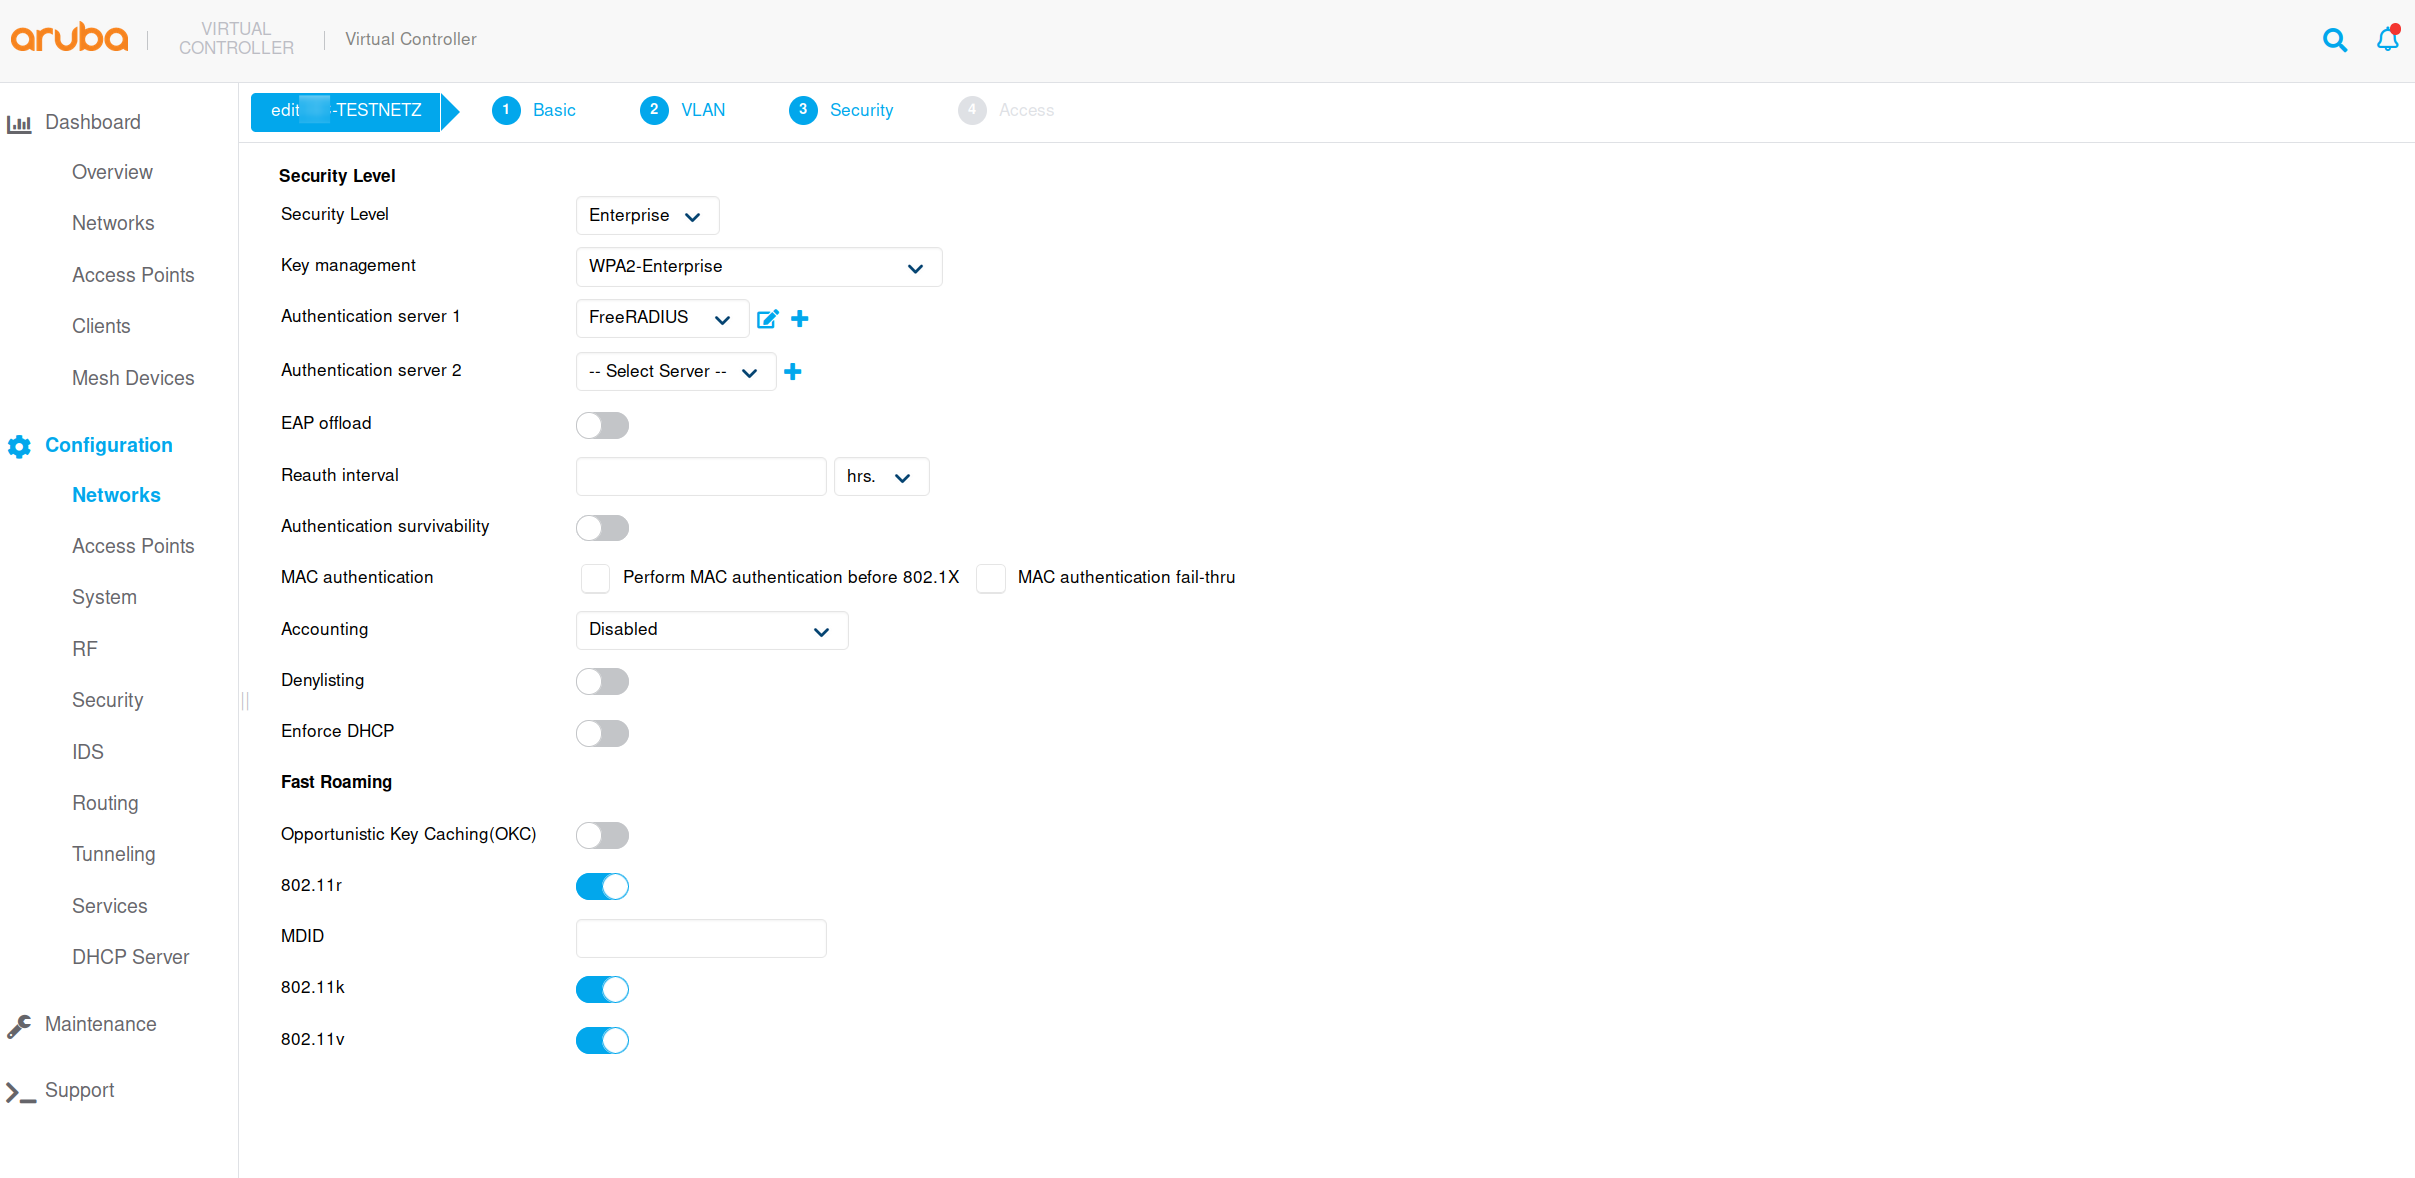
Next, we create a SSID with WPA2 Enterprise for the security. Select the newly created authentication server and save the configuration.
Client setup
For the client, we need the user certificates, we generated in part 2. I will create a hidden folder in the home directory and move the certificates.
# Create a hidden folderfedora :: ~ » mkdir ~/.certs# Move the certificates into it.fedora :: ~ » mv ${USER}.* .certs
Open the settings, navigate to “Wi-Fi” and select the SSID you created for this network.
Type in the required settings, select the user certificates and click on connect.
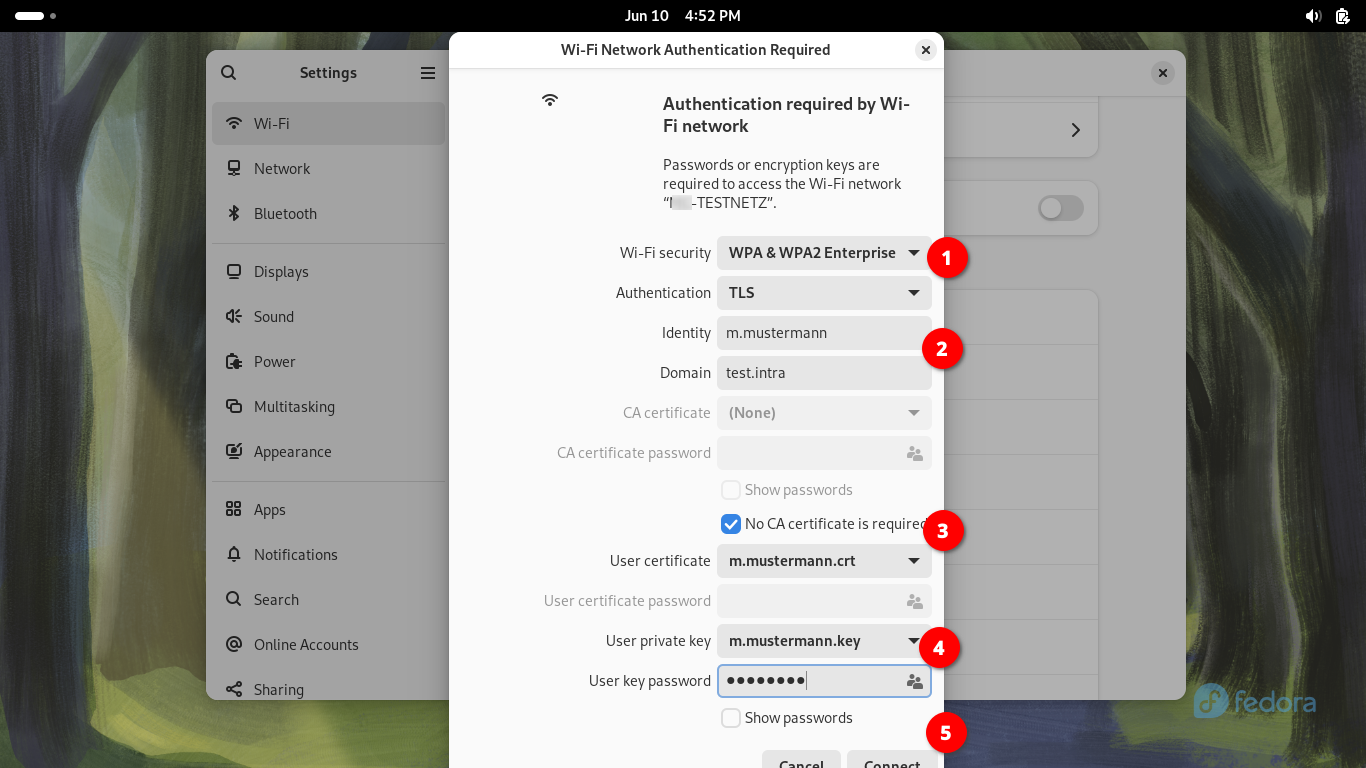
If everything worked correctly, the connection should be established.
Testing wrong certificate.
I tested it with a self-signed certificate, which is not associated with the CA.
test-freeradius :: ~ » (16) eap_tls: ERROR: (TLS) OpenSSL says error 18 : self-signed certificate(16) eap_tls: (TLS) send TLS 1.2 Alert, fatal unknown_ca(16) eap_tls: ERROR: (TLS) Alert write:fatal:unknown CA(16) eap_tls: ERROR: (TLS) Server : Error in error(16) eap_tls: ERROR: (TLS) Failed reading from OpenSSL: error:0A000086:SSL routines::certificate verify failed(16) eap_tls: ERROR: (TLS) System call (I/O) error (-1)(16) eap_tls: ERROR: (TLS) EAP Receive handshake failed during operation(16) eap_tls: ERROR: [eaptls process] = fail(16) eap: ERROR: Failed continuing EAP TLS (13) session. EAP sub-module failed
The connection was denied, which is of course the correct behavior. I also tested different authentication methods.
CRL Check
Revoke certificate
Last configuration. I would like to add a crl check to this, so that I can revoke certificates, to deny access.
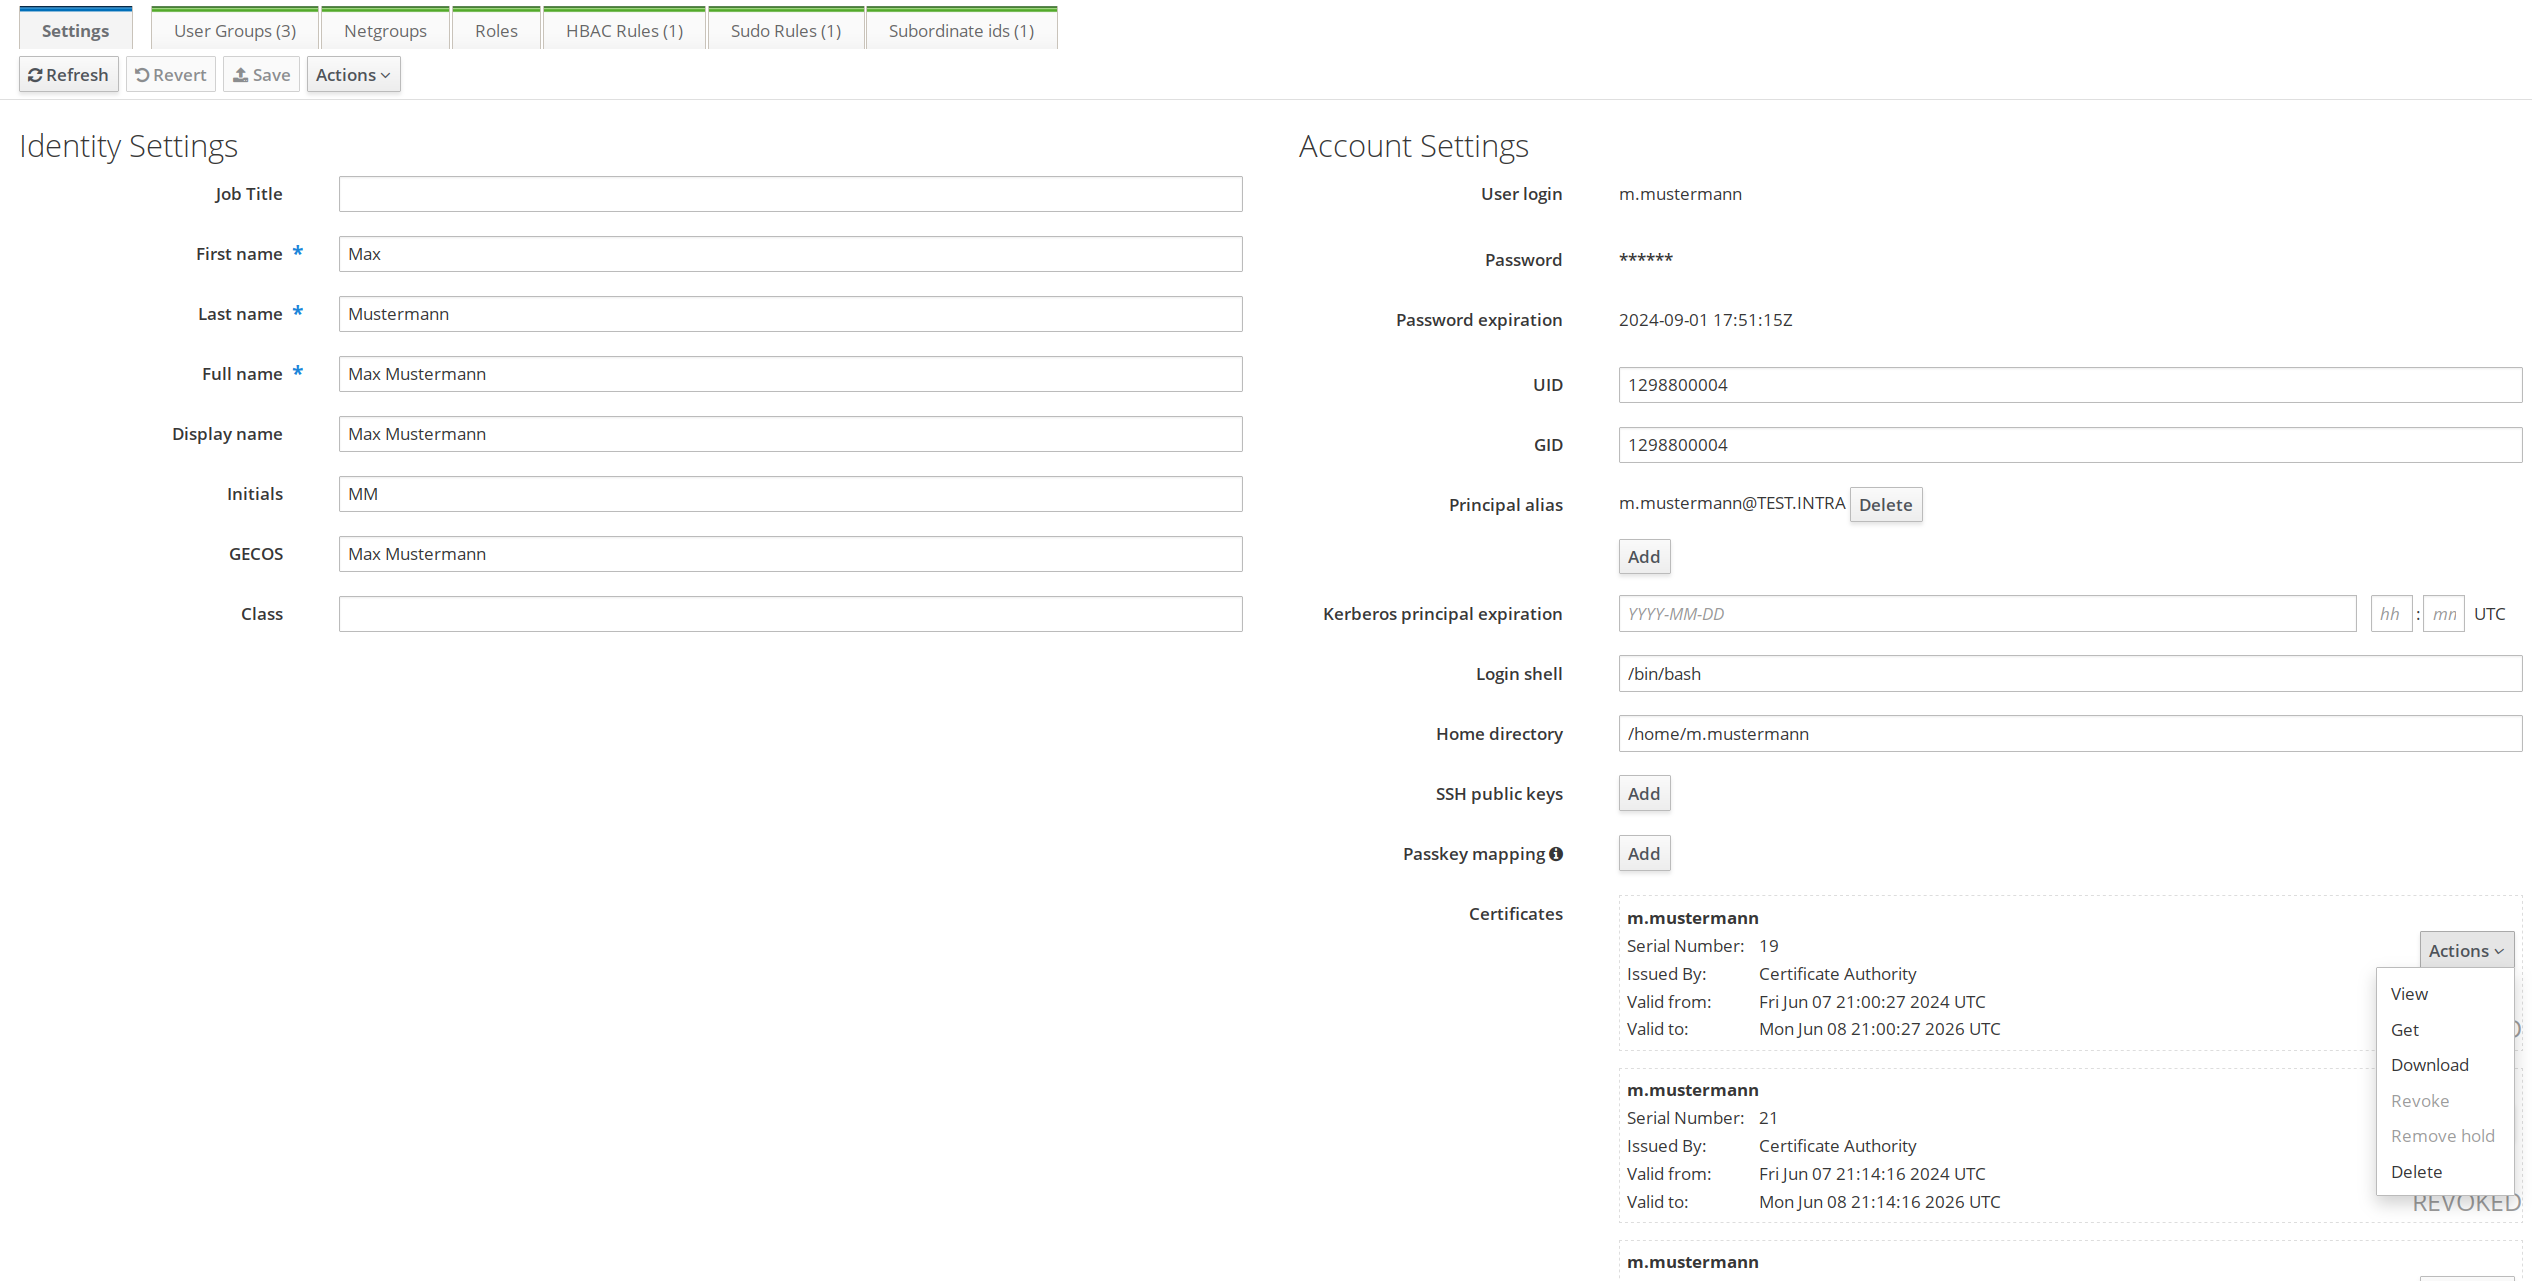
First, let’s revoke the certificates we generated earlier. Either do this from the WebUI in the “Certificates” tab or from within the user account settings.
In the user account settings, select “Action” next to the certificate and choose “revoke”.
Restart CRL Management Service
The CRL is generated every 4h, so either we wait for that or we disable and enable the crl manager.
test-ipa1 :: ~ » ipa-crlgen-manage disable ; ipa-crlgen-manage enabletest-ipa1 :: ~ » ipa-crlgen-manage status CRL generation: enabledLast CRL update: 2024-06-12 08:48:14Last CRL Number: 74The ipa-crlgen-manage command was successful
Edit FreeRadius configuration for CRL
Now we can go back to our radius server. We have to edit the “eap” file under “/etc/raddb/mods-enabled” again and add the line in red.
test-freeradius :: ~ » vim /etc/raddb/mods-enabled/eapeap { default_eap_type = tls timer_expire = 60 ignore_unknown_eap_types = no cisco_accounting_username_bug = no max_sessions = ${max_requests} tls-config tls-common { private_key_password = private_key_file = ${certdir}/server.key certificate_file = ${certdir}/server.pem ca_file = ${cadir}/crl_ca.pem ca_path = ${cadir} cipher_list = "PROFILE=SYSTEM" cipher_server_preference = no tls_min_version = "1.2" tls_max_version = "1.2" ecdh_curve = "prime256v1" check_crl = yes cache { enable = no store { Tunnel-Private-Group-Id } } verify { } } tls { tls = tls-common }}
You might have noticed, that we replace the ca file. This is required, since we cannot define the crl file directly.
Next, we need the CRL file from FreeIPA. First, we download the bin file using “curl”, convert the file into the “pem” format and merge the “ca.pem” and “crl.pem” into one file.
We could create a script and automate the process in a cronjob.
test-freeradius :: ~ » curl https://test-ipa01.test.intra/ipa/crl/MasterCRL.bin --output /etc/raddb/certs/MasterCRL.bin % Total % Received % Xferd Average Speed Time Time Time Current Dload Upload Total Spent Left Speed100 709 100 709 0 0 5330 0 --:--:-- --:--:-- --:--:-- 5291test-freeradius :: ~ » openssl crl -inform DER -in /etc/raddb/certs/MasterCRL.bin -out /etc/raddb/certs/mastercrl.pemtest-freeradius :: ~ » cat /etc/raddb/certs/ca.pem /etc/raddb/certs/mastercrl.pem > /etc/raddb/certs/crl_ca.pem
Test the CRL configuration
Start the radius server in debug mode and test the client from earlier, with the correct certificates.
test-freeradius :: ~ » radiusd -X...(5) eap_tls: ERROR: (TLS) OpenSSL says error 23 : certificate revoked(5) eap_tls: (TLS) send TLS 1.2 Alert, fatal certificate_revoked(5) eap_tls: ERROR: (TLS) Alert write:fatal:certificate revoked(5) eap_tls: ERROR: (TLS) Server : Error in error(5) eap_tls: ERROR: (TLS) Failed reading from OpenSSL: error:0A000086:SSL routines::certificate verify failed(5) eap_tls: ERROR: (TLS) System call (I/O) error (-1)(5) eap_tls: ERROR: (TLS) EAP Receive handshake failed during operation(5) eap_tls: ERROR: [eaptls process] = fail(5) eap: ERROR: Failed continuing EAP TLS (13) session. EAP sub-module failed...
If everything worked, we should get an error message, telling us that the certificate has been revoked.
Alright. That’s it for now. We installed the FreeRADIUS server, integrated with FreeIPA, setup TLS authentication with the certificates and tested the whole setup.
Kommentare